Wednesday, October 30, 2013

Holloween: Candy Corn Cookie Bark

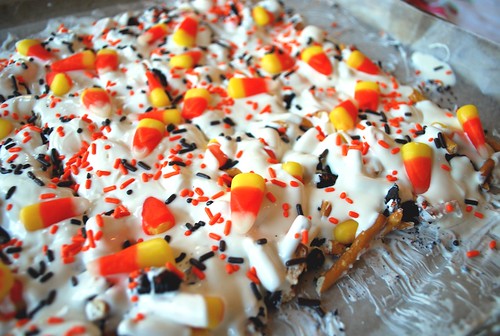
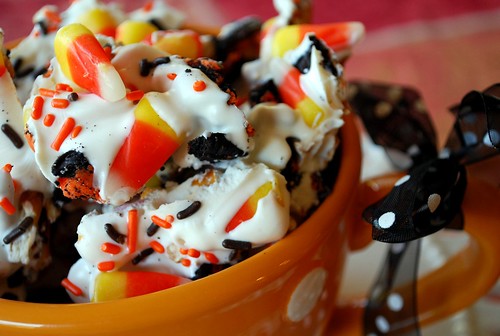
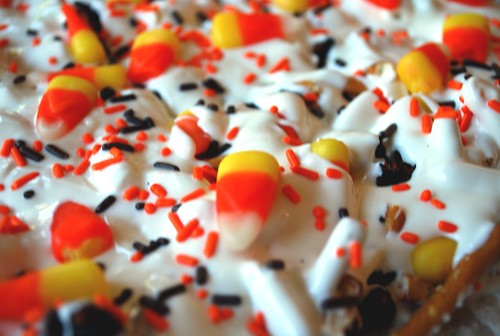
Candy Corn Cookie Bark!
Not only is it bright and colorful but it is yummy too!
The sweetness of the Oreos, white chocolate, and candy corn is a great combination with the saltiness of the pretzels.
The first step is to spread your broken up Oreos (I used the Halloween ones with the orange filling), pretzels and candy corn on a wax paper lined cookie sheet.
Candy Corn Bark
Melt your white chocolate (I prefer to use the round melting discs you can buy in the bulk food section.  I found them at Winco or  use Almond Bark) and pour over the top of the cookie mixture.  Spread with a spatula if needed to get it all covered.
Candy Corn Bark
I used my spatula to push the outer edges in toward the middle.
While the chocolate is still wet sprinkle remaining candy corn and brown and orange colored sprinkles over the top!
Candy Corn Bark
Let the chocolate set.  You may place in the refrigerator if needed.
Gently break bark into small pieces for serving and munching!
Candy Corn Bark
Candy Corn Bark
Store in an airtight container.

Monday, October 28, 2013

Ice Cream Sandwich Cake


Ice Cream Sandwich Cake


A quick easy and yummy dessert!


You can Line your pan with foil, or not works both ways!
Also, feel free to use different flavored sundae toppings and different candies. You can also add fruit. Below is our favorite combination.

24 ice cream sandwiches
16 ounces of cool whip
1 jar caramel sundae topping
1 bag of your favorite candy, coarsely chopped Reeses peanut butter cups 
This great recipe (and many others!) can be found in our cookbook.

Yep, that's it.

Lay half of the ice cream sandwiches (whole) in the bottom of a 9 x 13-inch pan, trimming the last couple to get complete coverage. Top with half of the cool whip, half of the caramel sundae topping and half of the candy. Lay down another layer of ice cream sandwiches. Top with remaining cool whip and spread out evenly with a knife, making a lip around the edge so the sundae topping won't run out and over the edges. Top with remaining candy, cover and freeze for several hours (or overnight) before serving.


Depending on how cold your freezer is, you may need to thaw it on the counter for 10-15 minutes before serving.

Homemade Jewelry Cleaner


Homemade Jewelry Cleaner

NEVER BUY JEWELRY CLEANER AGAIN!


1 tablespoon salt
1 tablespoon baking soda
1 tablespoon dish detergent
1 cup water
1 piece aluminum foil

Directions:

1. Heat water in the microwave for 1 or 2 minutes.
2. Cut a piece of aluminum foil that roughly covers the bottom of a small bowl (like a cereal bowl).
3. Pour hot water into bowl. Place salt, soda, and dishwashing liquid into bowl. Place jewelry on top of foil and let it sit for 5 to 10 minutes. Rinse jewelry in cool water and dry jewelry completely with soft cloth. Discard solution after use and make a new batch next time.
4. According to wire-sculpture.com, "this works well for gold-filled, brass, german (nickel) silver, and sterling silver. I have even cleaned jewelry with freshwater pearls, shell cameos and mother of pearl with no problem.".

Homemade Fabric Softener


What you will need:
2 cups of your favorite scented conditioner
3 cups of white vinegar
6 cups of water hot
A container to mix the ingredients and hold the softener in

Mix all ingredients together. You can use a pitcher to mix them all together and then just pour it into an empty containter.
It takes a minute of stirring, but do it until no more conditioner clumps. Don't shake it.
Use 1/4 cup per load and it works great!

Healthy Ice Cream Sandwich


**Healthy Ice Cream Sandwich**

-Ingredients-

-gram crackers
-cool whip
-strawberries

Directions

1. Blend cool whip and strawberries
2. Apply a thick coat to gram crackers and make sandwich
3. Freeze, and enjoy!

Doritos Chicken Casserole Recipe


Doritos  Chicken Casserole Recipe


Ingredients:

2 cups shredded cooked chicken
2 cups shredded Mexican cheese blend (divided)
1 (10 oz) can cream of chicken soup
1/2 cup milk
1/2 cup sour cream
1 can Ro-tel tomatoes (drained)
1/2 packet taco seasoning
1 large bag Doritos
Shredded lettuce (optional)
diced tomato (optional)


Step 1: Pre-heat the oven to 350 degrees. In a large bowl mix together shredded chicken, 1 cup of cheese, cream of chicken soup, milk, sour cream, Ro-tel tomatoes, and taco seasoning. Mix well.


Step 2: Grease a 2-quart casserole dish, and add a layer of crushed Doritos across the bottom. Top with a layer of the chicken mixture. Add another layer of crushed Doritos, and then add another layer of the chicken mixture. Top with remaining cheese. You can add more crushed Doritos on top as well if you wish.

Step 3: Cover and place into the oven and bake at 350 degrees for 30-25 minutes until bubbling hot. Remove from the oven and top with lettuce and tomato if you choose.
(Makes 4 Servings)

Fail-Proof Pizza Dough and Cheesy Garlic Bread Sticks


Fail-Proof Pizza Dough and Cheesy Garlic Bread Sticks {just like in restaurants!}
You will never need another pizza dough recipe after this one!

INGREDIENTS:
for the pizza dough-
1 cup warm water
2 1/4 teaspoons active dry yeast
1 tablespoon honey {or sugar}
2 teaspoons salt
2 tablespoons olive or canola oil
3 cups bread flour {give or take 1/2 cup...depending on the heat & humidity}

for the cheesy garlic bread sticks-
1/2 recipe Fail-Proof Pizza Dough from above
2 tablespoons softened salted butter
2 cloves garlic, finely minced
1/4 cup grated parmesan cheese {use the real stuff!}
1/4 pound grated mozzarella cheese
{salt & pepper, if desired}

DIRECTIONS:
For the pizza dough--In a large mixing bowl, preferably that of a stand mixer, stir yeast and honey into warm water. Sit for 5-10 minutes or until bubbles form and mixture starts to foam. This tells you that the yeast is alive and kicking. Pour in salt, oil and half the flour and mix. Once that flour is incorporated, start adding flour in bit by bit until you get the pizza dough to the consistency you want: slightly tacky, but when you touch it it doesn't stick to your hands. Once you reach this stage, knead for 6 minutes. Turn a timer on and walk away! Resist the temptation to stop earlier than 6 minutes! That seems to be the magical number. It should look something like this when it's done! The dough should be smooth and easy to work with. And the bowl should be clean! Lightly grease the bowl & the dough so it doesn't dry out, cover with plastic wrap and let it rise 1-2 hours. That's it! Use as desired.

For the Cheesy Garlic Bread Sticks- Preheat oven to 500 degrees with pizza stone inside. {If you don't have a pizza stone, use an upside down cookie sheet...a tip I got from Natalie!}
Mix butter and garlic in a small bowl and set aside.
Spread pizza dough out into a 12-inch circle on parchment paper. {This makes it easier to transfer to the pizza stone.}
Spread the butter and garlic mixture over dough and top with parmesan and mozzarella cheeses. Top with a light sprinkling of salt and pepper, if desired. {That step is totally optional!}

Saturday, October 26, 2013

Treetop Trail Mix

An easy Halloween treat: Treetop Trail Mix


ingredients


1 1/2  cups  crispy corn-and-rice cereal
1  cup  honey-roasted peanuts
3/4  cup  dried banana chips
1/2  cup  chocolate- or yogurt-covered raisins

directions

1. Place all ingredients in a resealable plastic bag. Seal bag. Shake well to mix.

Tip:

 For a Halloween party display, layer black and white cupcake liners, and machine-stitch through both layers to craft tiny snack baskets. Thread a length of black-and-white covered wire or pipe cleaner through opposite sides of the baskets to serve as handles.

Mini Corn Dog Bites

Refuel during the big game with Mini Corn Dog Bites. Mix up 

an 8.5oz box of corn muffin mix, divide batter into the Mini-

Muffin Pan, and add hot dog slices. Bake for 10-12 minutes 

at 375 degrees


Bis-Quick Dinner


Create Your Own Signature Mini Pie (and an easy way to get rid of leftovers!)

Mix 1/2 cup of Bisquick, 1/2 Cup of Milk, and 2 eggs together for a base. (put about 1 tablespoon in each muffin cup)

Top with about 1/4 cup of any "fillings" you want. - Cheeseburger, Pizza, BLT, Chicken and Veggies, etc.... You can mix it up in the pan (any meat should already be cooked)

Then top with one more tablespoon of the "Bisquick Mixture" - and bake at 375 for 25-30. It's a great way to get rid of your leftovers! These can also be frozen! Just pop them into the microwave for a quick meal on the go!

Chocolate Eclair Cake


Chocolate Eclair Cake


Ingredients


3 box french vanilla instant pudding
8 oz cool whip
1 can(s) chocolate fudge icing
4 c milk
1 box graham crackers (honey graham or chocolate)

Directions


1 Beat pudding and milk until thick. Fold in cool whip. Line a 9 x 13 pan with graham crackers. Pour 1/2 of the pudding mixture over crackers. Add another layer of crackers, then cover with remaining pudding. Add another layer of graham crackers.


2 Then microwave the icing for about 30-45 seconds. You want it to be able to pour. Then pour over the graham crackers. Refrigerate for about 4 hours.

Funnel Cake


Funnel Cake


Ingredients:


The Batter:


There are a few different recipes for funnel cakes, but they all share one crucial ingredient: FUN! Seriously, you and your loved ones will have a blast making these cakes. You will need a deep fryer to properly make these treats.

2 Cups of milk
1 egg, beaten
1 tsp vanilla
2 Cups of all-purpose flour
1 tsp salt
1 tsp baking soda
1 tbsp sugar
1/2 stick of butter, melted

Directions:


Combine milk, egg, and vanilla in a large bowl. In a separate bowl, combine flour, salt, baking soda, and sugar and gradually add to wet ingredients. Beat with a mixer until a smooth batter forms. Fold in melted butter. Pour batter into a funnel or squeeze bottle while using your index finger to stop the flow of the batter. Bring the funnel over the hot oil and release your finger to start a stream of batter while moving the funnel in a circular motion to create spiral-like shapes. Fry for 2 to 3 minutes until golden brown and fluffy.

The Toppings:


The traditional topping for funnel cake is plain 'ol powdered sugar. But if you're going to make these treats from scratch, you may as well up the ante and top them with some holiday cheer. Here are a few ideas for some toppings:

Caramel Topping:


2 cups brown sugar
1 cup dark corn syrup
1 can sweetened condensed milk
1/2 cup margarine
1 teaspoon vanilla extract

Directions:


Combine sugar and syrup. Cook until soft ball stage. Remove from heat. Add remaining ingredients. Bring to a boil and remove from heat. Pour over funnel cake.

Cranberry Topping:


2 teaspoons cornstarch
1/4 cup freshly squeezed orange juice
1 16-oz can organic whole-berry cranberry sauce

Directions:


In a small saucepan whisk together the cornstarch and orange juice to combine, making sure there are no large clumps. Pour in cranberry sauce, stir, and bring mixture to a boil over medium to medium-high heat for one minute. Cool for 10 minutes. Pour over funnel cake.

Cinnamon Apple Topping:


2 tbsp. bottle lemon juice
1/3 c. water
7 c. thinly sliced, peeled, Granny Smith apples
3 c. sugar
3/4 tsp. Cinnamon

Directions:


In a 6-8 quart saucepan, heat lemon juice for 1 minute over medium -high heat. Add water, apples, sugar and cinnamon. Bring to a full rolling boil, stirring constantly. Continue boiling for 3 minutes, stirring constantly. Remove from heat. Spoon out over funnel cake.

Note:


*If you don't have a deep fryer, you can make them in a cast iron skillet.one of the deeper ones like a chicken fryer. You can also do it in a dutch oven. It doesn't matter as long as you can put about 3" of oil in the pan and that it's wide so the batter has room to spread out. Also, you can put the ingredients in a zip bag and knead it until the batter is smooth. Then cut the corner off the bag and pour into the pan. I found it easier to control than a funnel. It seemed the opening in the funnel was too big and the batter came out too fast. We made them at our ballpark one year and didn't have a mixer.
Wednesday, October 23, 2013

Cinnamon Roll Pancakes


Cinnamon Roll Pancakes


Ingredients:


for the Pancakes:

4 cups all-purpose flour
8 tsps baking powder
2 tsp. salt
4 cups milk
4 tbsps vegetable oil
4 large eggs, lightly beaten

for the Cinnamon Filling

1 cup butter, melted
1 1/2 cup brown sugar, packed
2 tbsp ground cinnamon

for the Cream Cheese Glaze

1/2 cup butter
4 oz. cream cheese
1 1/2 cups powdered sugar
1 tsp. vanilla

Directions:


To make the Cinnamon Filling:

Mix the three ingredients together. Place in a disposable piping bag and snip the end off or put in a Ziploc bag and snip the corner off.


To make the Pancakes:

Mix the dry ingredients in one bowl and the wet ingredients in another bowl. Stir them together until everything is moistened leaving a few lumps.


Heat your griddle to exactly 325 degrees. You don't want these too cook too quickly, and you won't want your cinnamon to burn.


Make desired size pancake on greased griddle and then using the piping bag and starting at the center of the pancake, create a cinnamon swirl. Wait until the pancake has lots of bubble before you try to turn it. You will find that when you turn it the cinnamon swirl will melt. The cinnamon will melt out and create the craters which the cream cheese glaze will fill.


To make the Cream Cheese Glaze:

In a microwave safe bowl melt the butter and cream cheese and then stir together. Whisk in the powdered sugar and vanilla. Add a little milk if needed to make
it a glaze consistency.

Place pancake on plate, then cover with cream cheese glaze.

Tuesday, October 22, 2013

halloween chex® mix

                    halloween chex® mix


ingredients
8   ounces
white chocolate baking bars, coarsely chopped

4   cups
Corn Chex® or Rice Chex® cereal

2   cups
bite-size pretzel twists

1/2  cup
raisins


1   cup
candy corn

1/4  cup
Betty Crocker® orange and black candy decors


directions
1.
In large microwavable bowl, microwave chopped baking bars uncovered on High 1 minute 30 seconds to 2 minutes 30 seconds, stirring every 30 seconds, until melted and smooth.
2.
Gently stir in cereal, pretzels and raisins until evenly coated. Stir in candy corn and decors.
3.
Spread on waxed paper or foil until cool and chocolate is set, about 30 minutes. Break into chunks. Store loosely covered.

Great Pumpkin Cake


Great Pumpkin Cake


  • 1
  • pkg.  (2-layer size) yellow cake mix

  • 1
  • pkg.  (8 oz.) PHILADELPHIA Cream Cheese, softened

  • 1/4
  • cup  butter, softened

  • 4
  • cups  powdered sugar

  •  Few drops each green, red and yellow food coloring
  • 1  COMET Cup


PREPARE cake batter and bake in 12-cup fluted tube pan as directed on package. Cool in pan 10 min. Invert cake onto wire rack; remove pan. Cool cake completely.
MEANWHILE, beat cream cheese and butter in medium bowl with mixer until well blended. Gradually beat in sugar until well blended. Spoon 1/2 cup frosting into small bowl; stir in green food coloring until well blended. Spread half the green frosting onto outside of ice cream cone; set aside. Reserve remaining frosting for later use.
ADD red and yellow food colorings to remaining white frosting to tint it orange. Spread onto cake to resemble pumpkin. Invert ice cream cone in hole in top of cake for the pumpkin's stem. Pipe the reserved green frosting in vertical lines down side of cake.

Halloween Mummy Spinach Dip


Halloween Mummy Spinach Dip


what you need

1
pkg.  (16 oz.) frozen pizza dough, thawed
1
 egg, beaten
2
sticks  KRAFT or POLLY-O Mozzarella String Cheese
2
 black olive slices
1
cup  BREAKSTONE'S Reduced Fat or KNUDSEN Light Sour Cream
1/4
cup  KRAFT Lite Ranch Dressing
1
pkg.  (10 oz.) frozen chopped spinach, thawed, well drained
1
 green onion, sliced
1/2
cup  finely chopped red peppers
1/4
cup  KRAFT Grated Parmesan Cheese
1/4
tsp.  ground black pepper
 WHEAT THINS Original Snacks

make it

PAT dough into 12x6-inch oval on baking sheet sprayed with cooking spray. Indent dough, about 3 inches from one end of oval, for the mummy's head. Let rise in warm place 20 min. or until doubled in volume.
HEAT oven to 375ºF. Brush dough with egg. Bake 18 to 20 min. or until bread is golden brown and sounds hollow when tapped lightly. Pull apart string cheese to make about 16 strips; arrange on bread for the mummy's wrappings. Bake 1 to 2 min. or just until cheese is melted; cool slightly. Press olive slices into bread for the mummy's eyes; cool completely.
MEANWHILE, mix sour cream and dressing in medium bowl until well blended. Stir in next 5 ingredients. Refrigerate 30 min. or until ready to serve.
USE sharp knife to remove bread from top of mummy's body; scoop out bread from center, leaving thin shell on bottom and side. (Reserve bread top. Discard removed bread or reserve for another use.) Fill bread with spinach dip just before serving; cover with top of bread. Serve with WHEAT THINS. 

Bats & Cats Chocolate Halloween Cookies


what you need

3
cups  flour
1-1/2
tsp.   Baking Powder
1/2
tsp.  salt
1
cup  butter or margarine, softened
1-1/2
cups  granulated sugar
2
 eggs
1-1/2
tsp.  vanilla
1
pkg.  (4 oz.) BAKER'S Unsweetened Chocolate, melted
2
tubes  (0.68 oz. each) decorating gel, any color

make it

HEAT oven to 350°F.
MIX flour, baking powder and salt until well blended. Beat butter and sugar in large bowl with mixer until light and fluffy. Blend in eggs and vanilla. Gradually beat in flour mixture. Add chocolate; mix well. Divide dough in half; wrap tightly in plastic wrap. Refrigerate 2 hours.
PLACE half the dough on lightly floured surface; roll into 1/8-inch thickness. Cut into bat and cat shapes with 3-inch cookie cutters, rerolling scraps as necessary. Place, 2 inches apart, on baking sheets. Repeat with remaining dough.
BAKE 10 to 12 min. or until firm around the edges. Cool on baking sheets 2 min.; transfer to wire racks. Cool completely. Decorate with gel.

Monday, October 21, 2013

Hot Dog Mummies


Crispy Phyllo Wrapped Hot Dog Mummies

From Food Network Kitchen

Read more at: http://www.foodnetwork.com/food/cda/recipe_print/0,1946,FOOD_9936_641388_RECIPE-PRINT-FULL-PAGE-FORMATTER,00.html?oc=linkback


No need to be too meticulous when wrapping these spooky versions of pigs in blankets; the raggedy look suits the mummy theme to a "tee."

Ingredients

One 16-ounce package bun-size hot dogs (8 hot dogs), each halved crosswise
2 ounces Cheddar, cut into 16 thin slices
1/2 teaspoon kosher salt
1/4 teaspoon garlic powder
1/4 teaspoon freshly ground black pepper
8 sheets phyllo dough
4 ounces (1 stick) unsalted butter, melted

Ketchup, yellow mustard, barbecue sauce or your favorite dipping sauce, for serving and decorating

Directions

Preheat the oven to 400 degrees F and line a rimmed baking sheet with parchment paper. Cut a slit in each hot dog piece and stuff with a slice of cheese. Set aside. Combine the salt, garlic powder and pepper in a small bowl.

Working with one sheet of phyllo at a time and keeping the rest covered under a damp towel or paper towels, lay a phyllo sheet on a large cutting board or counter and lightly brush with melted butter. Lightly sprinkle with some of the spice mix and fold in half lengthwise. Brush the top with more melted butter and cut into 1/2-inch-thick strips. Using 2 pieces of stuffed hot dogs per phyllo sheet, wrap half of the strips around each piece of hot dog to create a mummy look. Leave a small section of hot dog exposed towards the top so it looks like the top part of the face peeking out from the phyllo wrappings. Don't worry about frayed edges or tears-- it will add to the mummy look.

Place on the prepared baking sheet and repeat with the remaining phyllo, melted butter, spice mix and hot dogs. Remelt the butter if it cools down too much while forming the mummies.

Bake until the phyllo is crisp and golden brown, about 25 minutes. If desired, dot ketchup or mustard eyes on each mummy using a toothpick and serve with extra sauces for dipping.

Read more at: http://www.foodnetwork.com/food/cda/recipe_print/0,1946,FOOD_9936_641388_RECIPE-PRINT-FULL-PAGE-FORMATTER,00.html?oc=linkback

Halloween: fun pumpkin decorations


Total Time 1 hourAges all-ages
Dried citrus rinds give this seasonal squash -- and his companions -- their un-natural good looks.

What you'll need

  • Craft knife
  • Hole punch
  • Glue dots
  • Spaghetti squash
  • Two limes
  • Black craft foam
  • Duct tape
  • Toothpicks
  • Large bolts
  • Black permanent marker

How to make it


  1. Frank's Friends
    First, decide if you want to make Frank or one of his creepy friends.


  2. Use a craft knife to cut a circle of rind from the top and bottom of an orange or lime for the eyes (a parent's job).
     Cut a slit in the remaining peel and remove it intact to use for ears, teeth, and other features. If you're making the witch, reserve the larger pieces of orange peel for the hair.


  3. Clean the fruit from the rinds, then use scissors to snip out your character's facial features, as shown. Cut them a little larger than you want; they will shrink as they dry. To dry the pieces, bake them on a foil-lined cookie sheet at 175 degrees for 20 minutes, then allow them to air dry for about 1K hours (or until glue dots will stick to them).


  4. Use a hole punch to make a pair of pupils from the craft foam, then adhere them to the white side of the rind eyes with glue dots.


  5. Attach all the pieces with glue dots, as pictured. To make the ears stick out (for Frank and the Count), tape a toothpick to the back, leaving about 1K inches of the toothpick exposed, then insert it in place.


  6. Frank 'n' Friends - Step 5


    Finishing touches for Frank: Cut the hair from craft foam following the diagram at right and attach it with glue dots. Bore a hole on each side of the squash with a pencil, then insert the bolts. Use a permanent marker to draw the teeth


    .
  7. Frank 'n' Friends - Step 6


    Finishing touches for Witch: Cut a small mouth from the craft foam. To make a hat, cut the shapes shown at right from a piece of black craft foam. Roll the half-circle into a cone with a base slightly larger than the center of the ring, and secure the edge with glue dots. Tuck the cone's base into the center of the ring. For the buckle, double-fold a sheet of foil to create a square shape. Snip out the center, then adhere it to the hat with glue dots.


  8. Finishing touches for the Mummy: Wrap the pumpkin in gauze, using glue dots to attach the fabric as you go.


  9. Frank 'n' Friends - Step 8


    Finishing touches for the Count: Cut a collar and hair from the craft foam, following the diagram at right. Wrap each around the pumpkin and attach them with glue dots, as shown.